|
The Plank Pose is one of the most fundamental postures in all forms of physical fitness and yoga. 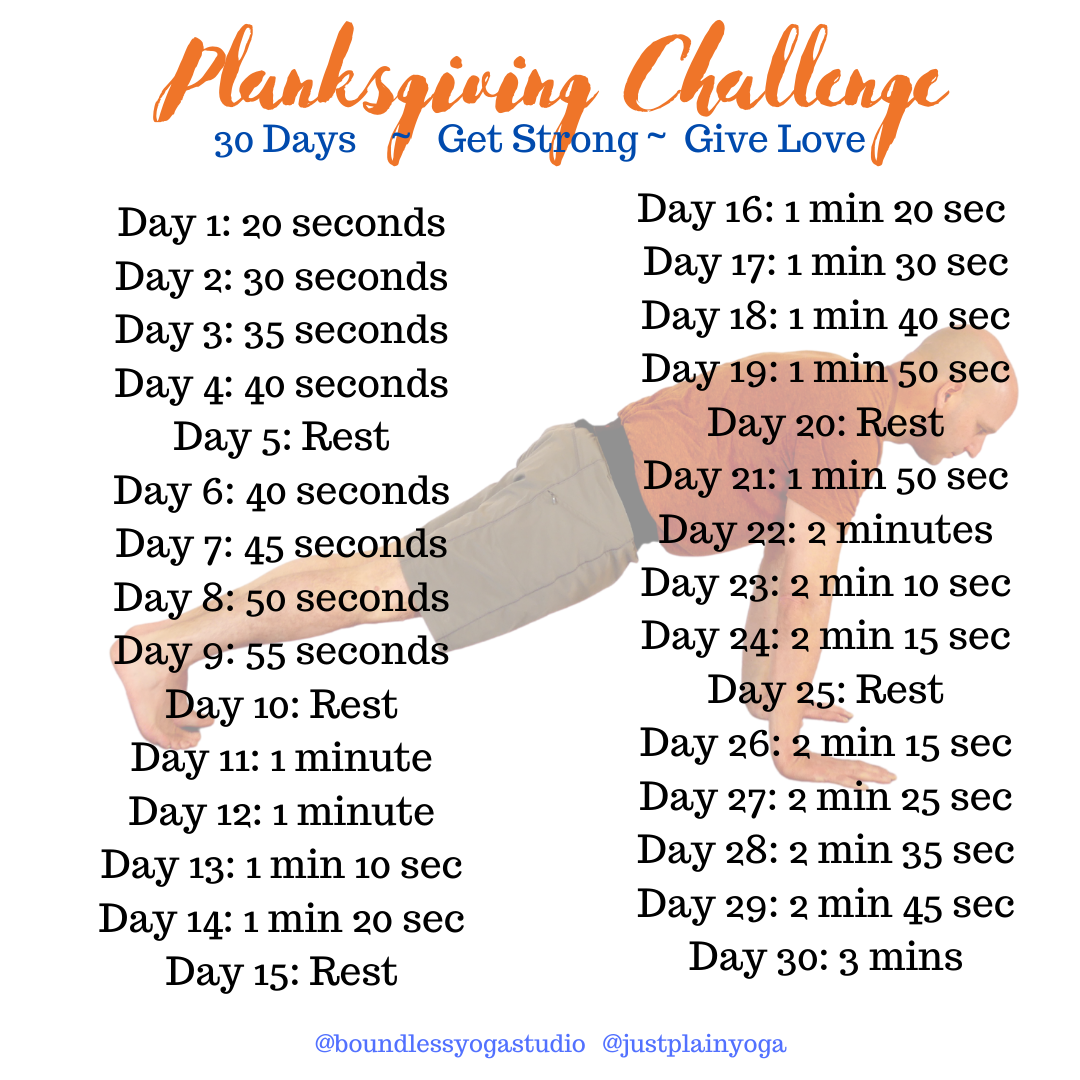 Many of us have a love & hate relationship with plank pose. This is a beginner friendly challenge pose that will make you core strong and build the endurance needed for all arm balancing postures. We love this pose for all of the incredible benefits and it's accessibility. And it makes us work to do it well so we love to hate it just a little bit too. 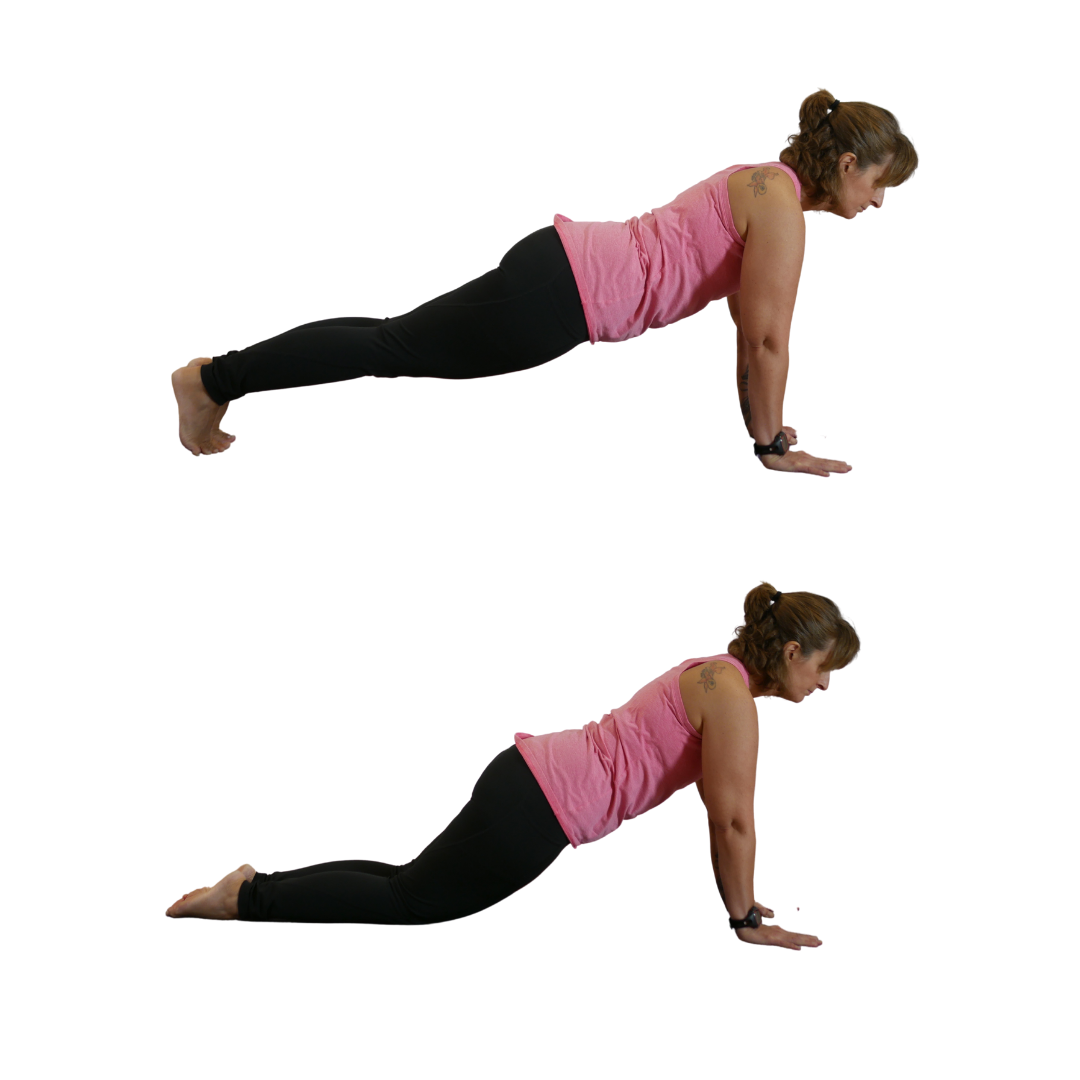 How to do Plank Pose 1. Plant hands directly under shoulders, shoulder distance apart. Step the feet back to create the long line from the heels through the head.(the top position of a push-up). 2. Ground toes into the floor and squeeze glutes to stabilize your body. Your quads should be working, too to keep the legs straight. (You may modify the amount of weight bearing and decrease the core load by placing the knees on the ground while maintaining the plank line from knees through the crown of the head. Quads will not be working in the modified position. ) 3. Neutralize your neck and spine by looking at a spot on the floor about a foot beyond your hands. Your head should be in line with your back. 4. Push strongly through the hands (or forearms if modifying for the wrists) to keep the back of the shoulders broad. (Protraction of the shoulder blades). 5. Hold the position for 20 seconds to begin. As you get more comfortable with the move, hold your plank for as long as possible without compromising your form or breath. (The challenge photo will help you increase your time each day.) 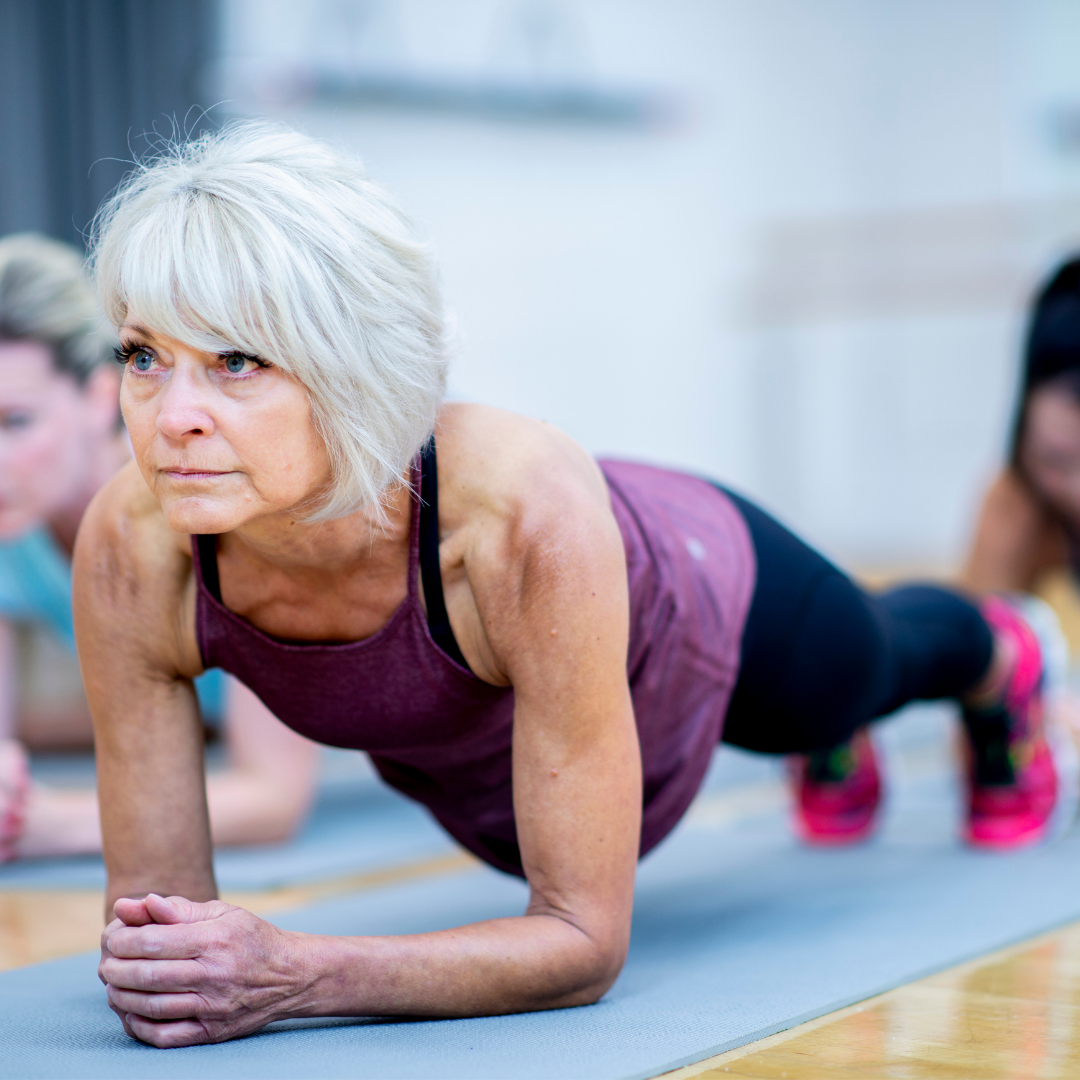 Keep all the core work but take all of the pressure out of the wrists by doing plank on your forearms. Common Pitfalls in Plank Note: Plank pose is not for students with shoulder injuries. Always check with a qualified medical professional for information and protocols for your specific injuries. 1. Collapsing your lower back Instead of compromising your lower back by dipping your butt, engage your core by pulling your navel in toward your spine. (Uddiyana Bandha) This will help keep your torso elongated. Keep your abdominal muscles super engaged as the hips move slightly lower than the shoulders, but not dipping too far towards the floor. 2. Collapsing in the head The head is part of the full extension of the spine. Focus your gaze (Drishti) approximately a foot in front of you to help keep the head and neck neutral. 3. Collapsing in the shoulders If we do not push the floor away the shoulder blades will sink together (retraction of the shoulder blades) Instead, push the floor away to broaden the shoulder blades (protraction of the shoulder blades). This will support the health and strength of the shoulders. The protraction will engage the serratus anterior muscle that runs under the shoulder blade and attaches on the outer ribs preparing your strength for a whole world of arm balances. 4. Breathe When we are in postures that challenge our muscle endurance and strength it is common for people to hold their breath. Instead, keep the core engaged and maintain a steady and even breath. 5. Worrying about the time. The challenge is meant to give you inspiration, but do not become obsessed with the timer. Set it and then shift your focus on what is happening in your form. Keep scanning the body and recommitting to your alignment and breath awareness. If you feel that you really need to come down, try to stay one breath longer than you think you can and then exit. Consistency will bring long term results even if you release the pose a bit sooner on any given day. 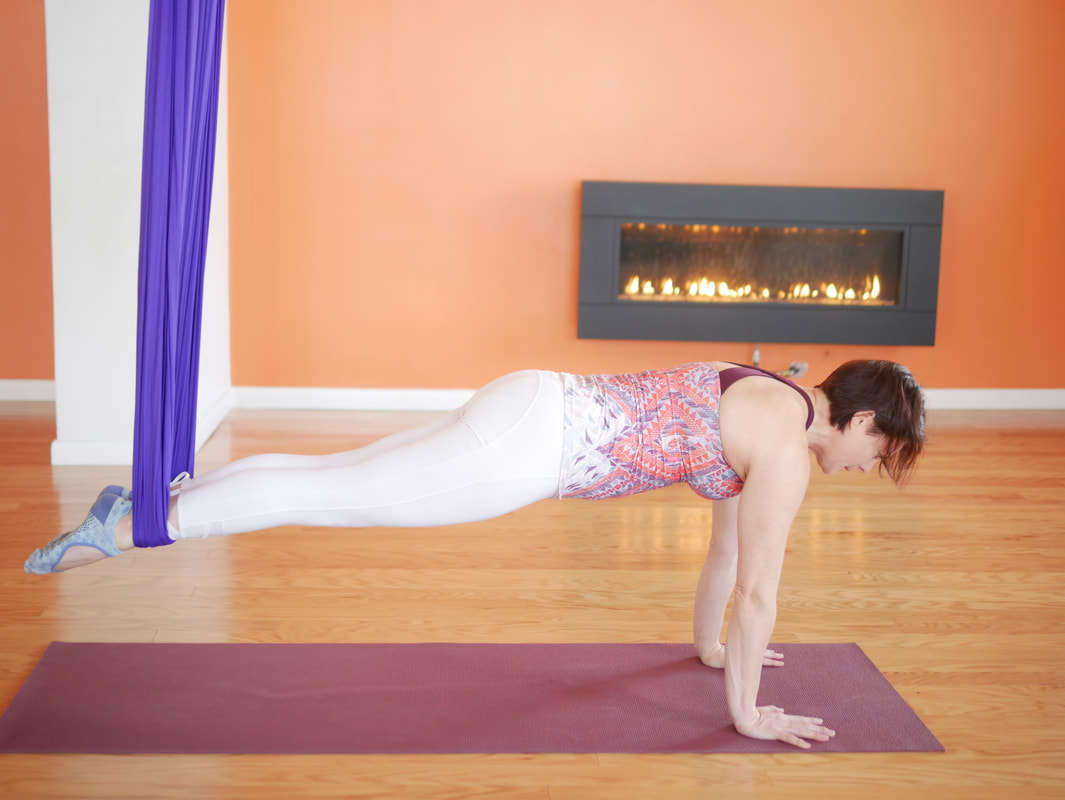 Add some fun and challenge by elevating the feet. Chris Loebsack demonstrated plank in Aerial Yoga.  About Chris Loebsack
0 Comments
 Chris Loebsack demonstrated Triangle pose. Photo by Joe Longo Photography @AsburyPark NJ Utthita TrikonasanaExtended Triangle Pose - Level One Standing Poseoot-Tee-ta Tree-CO-naah-suh-nuh उत्थित त्रिकोणासन “When I get the lines clear, it not only looks good but feels amazing! Your body is a geometric collection of lines and curves. In Yoga, you use your body to create shapes—triangles, squares, and diamonds. ” ~Alyona Mindlin Utthita means extended or stretched. Trikona translates specifically to tri= three, kona= angle, or as translated into English triangle. Asana means seat, pose, or posture. The full standing pose would be called extended triangle pose, but it is often shortened to simply triangle pose. Extended triangle pose is an asymmetrical standing pose that is also a hip opener and works mild spinal rotation. It is performed two times. Once to the right and then to the left. The most striking part of the triangle pose is it’s incredible geometry. You can find the triangle in so many spaces of the body. The pose is first described in the 20th century, appearing in the teaching of Krishnamacharya, including his 1934 book Yoga Makaranda, and in the teachings of his well known students, Pattahabi Jois, and B.K.S. Iyengar. In the Ashtanga series by Pattahbi Jois, the pose can be found as the third standing pose after the sun salutation series. In Light on Yoga by Iyengar, the pose presents itself on as forth posture in the asana (pose) section. 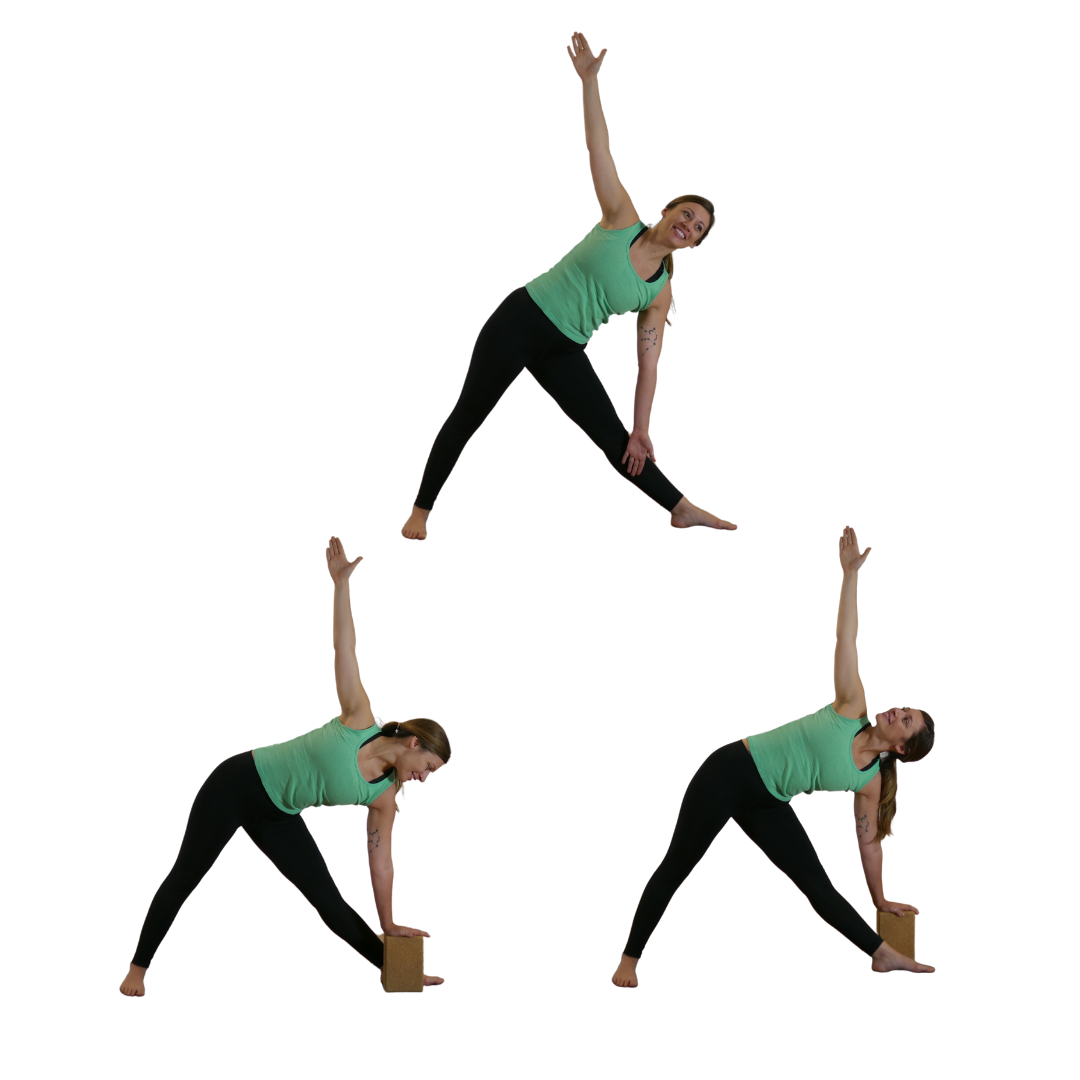 Yoga Educator Jessica Garris demonstrates a few supported variations. Gazing down will be easier on the neck than gazing up to the top hand. How to do Utthita Trikonasana
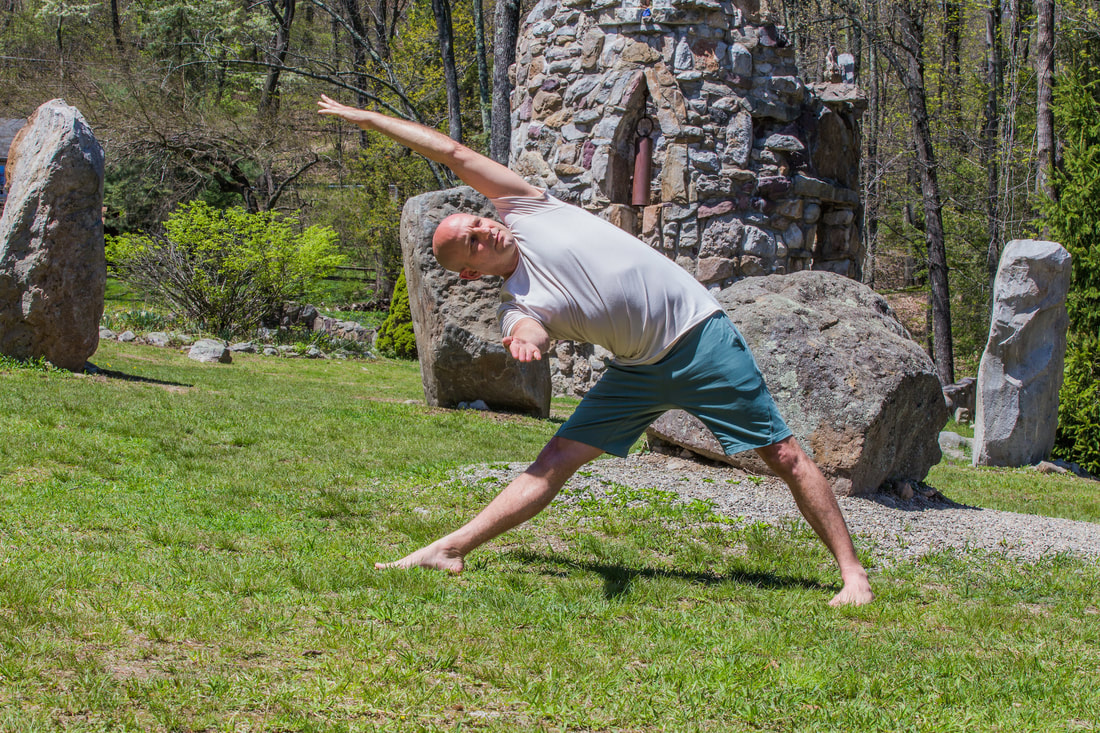 Yoga Educator Brian Davis demonstrated a strong core strength variation of triangle pose. Benefits
Tree Pose (Vrksasana) Simple twists Fan Pose 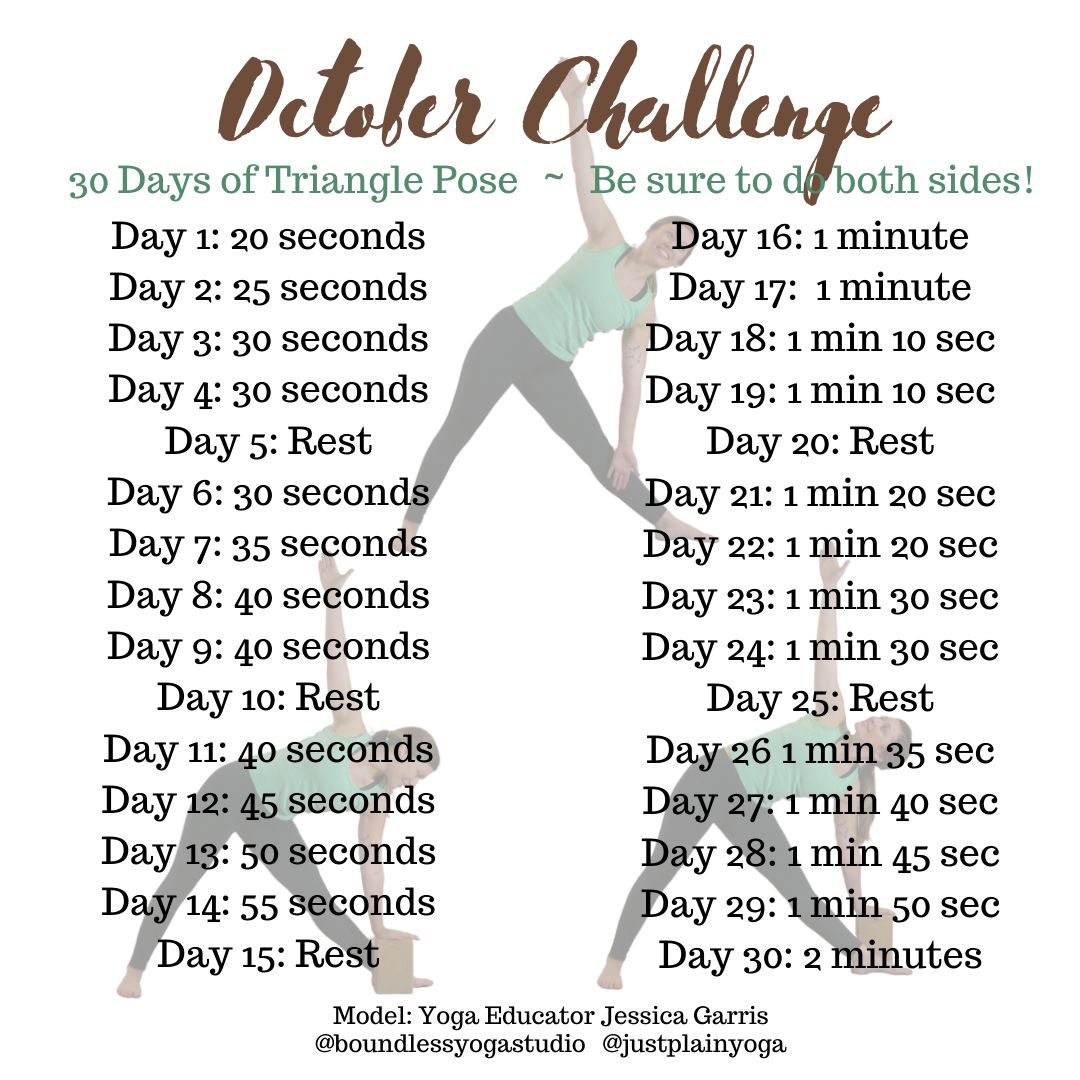 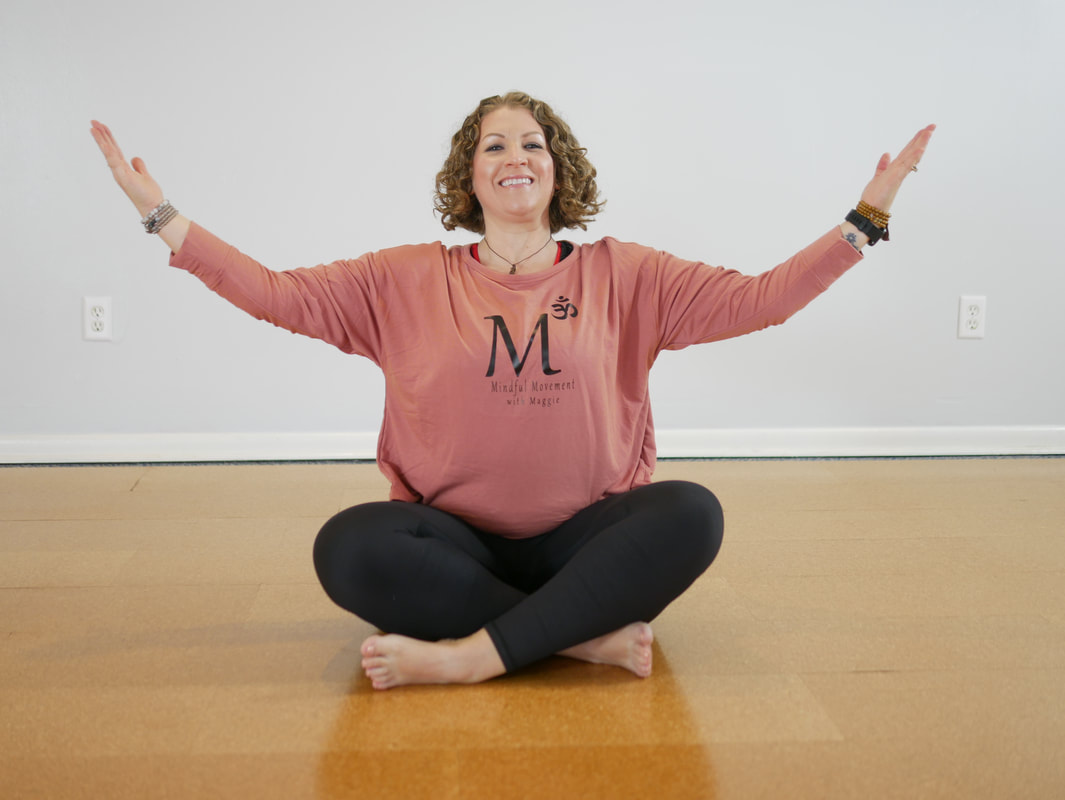 Educator Maggie Wetzel of MIndful Movment with Maggie Sutra 2.26 STHIRA SUKHAM ASANAM Sthira= Steady, stable, motionless; sukham= comfortable, good space; asanam= seat (western translation=posture) The Seat should be steady and have good space. (Asana is a Steady, Comfortable posture) This steady comfortable seat or posture comes from the balance of the two polarities of stability and softness. To perfect the meditation students may draw their attention to two means
Freedom from pairs of opposites: From the attainment of a perfected posture, there arises an unassailable, unimpeded freedom from suffering due to the pairs of opposites such as heat and cold, good and bad, or pain and pleasure (YS 2.47-48) Hips: To prop or not to prop! The question of props in asana may vary from style to style. In a moving flow there may not be enough time to place a support long enough to be effective or a student may not be in a posture long enough to become uncomfortable. Pranayama and meditation generally increase the amount of time spent in a single posture and therefore so does the need for support among many students. Common Struggles
Solutions
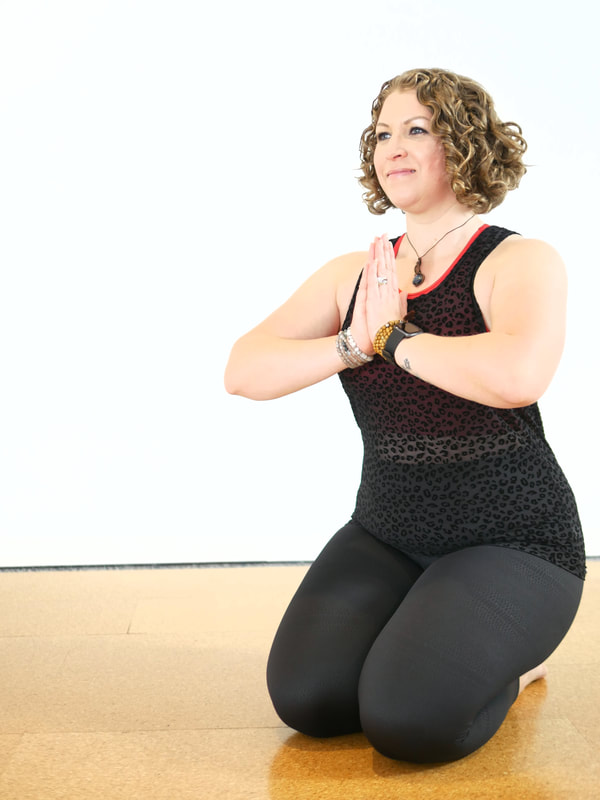 Maggie Wetzel Sitting on heels- Vadrasana the thunder bolt, a modified version of Virasana, hero's pose where one sits between the heels. Hero Posture (Virasana) a.k.a. Diamond Seated Posture Possible Props: Bolster, Block, Blankets How To:
Remain in the posture 5-30 minutes. Benefits:
Cautions:
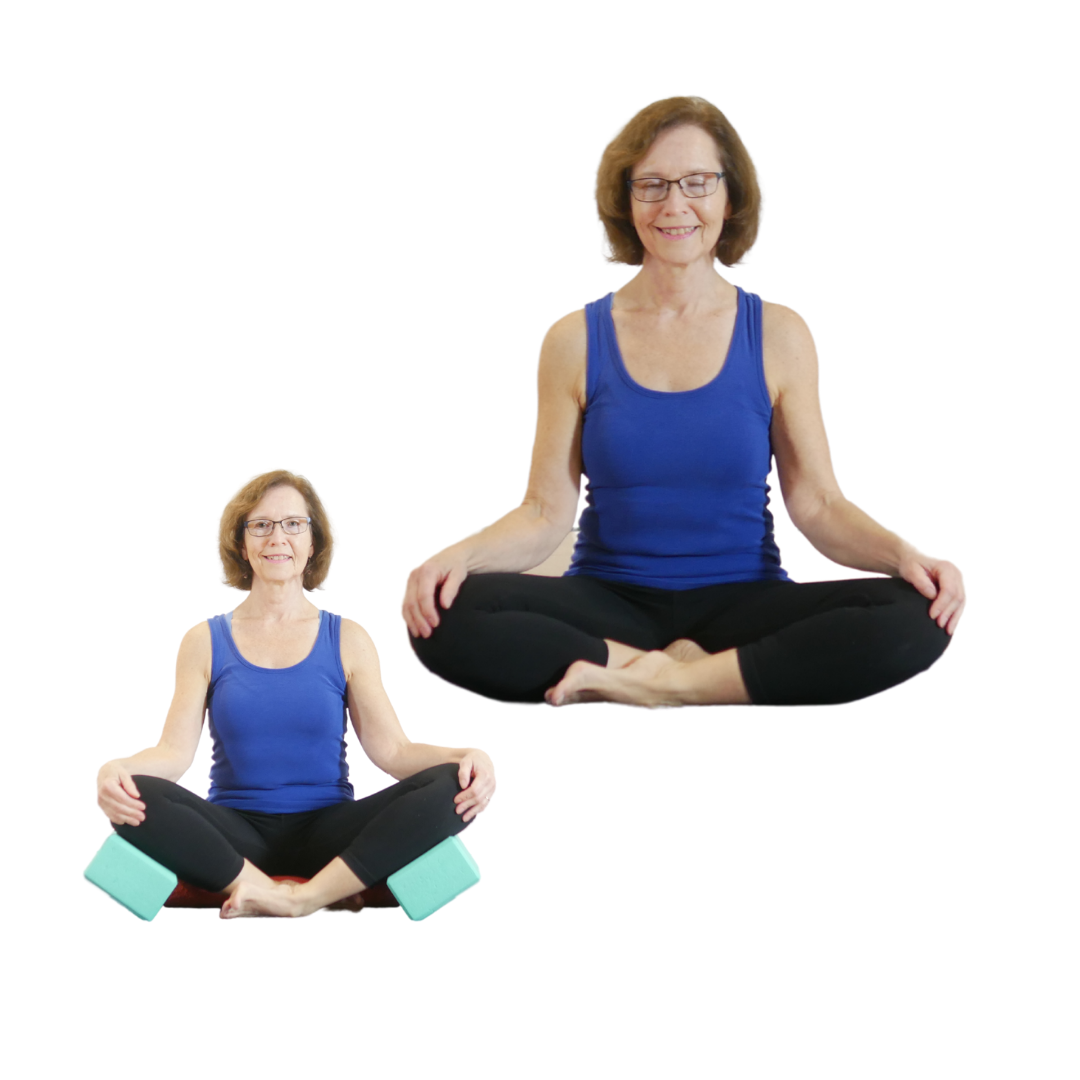
Tips/ Variations: If the pose puts strain on the ankles, place a rolled blanket under them before you sit your weight back onto them. If the knees feel strained or the thighs are tight place a block or bolster under the hips to elevate the pelvis 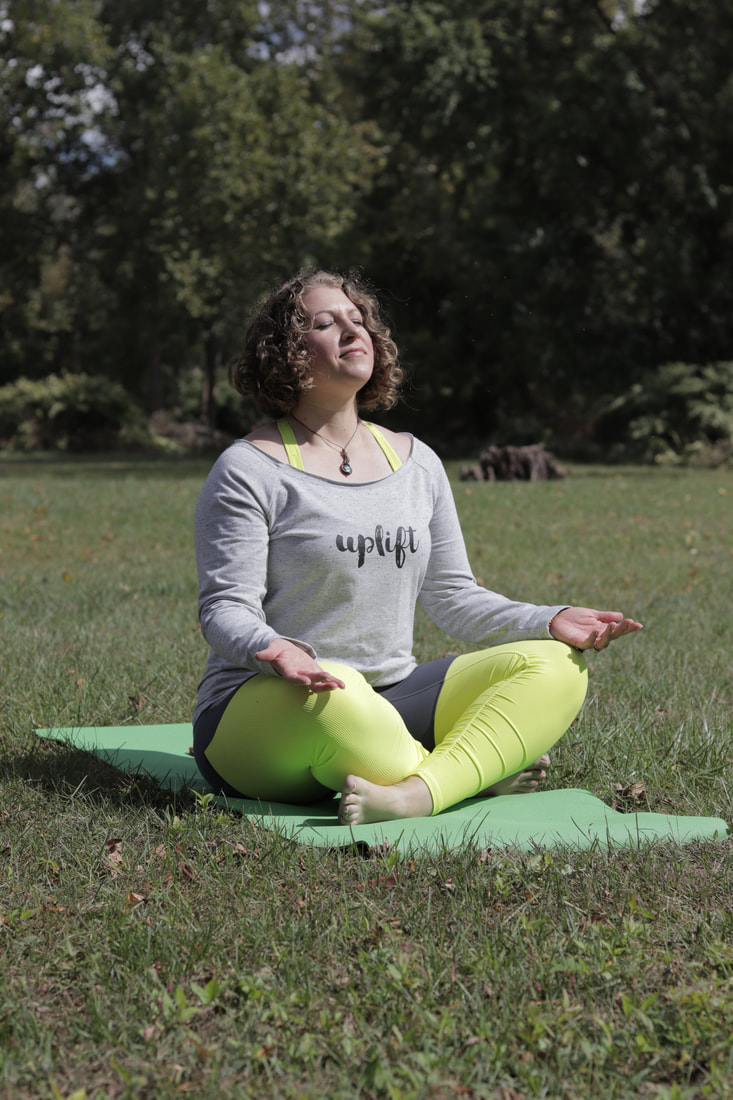 Maggie beautifully demonstrates Sukhasana, easy seat. Easy Seat (Sukhasana) Seated Posture Possible Props: Meditation Cushion, Blankets, Blocks How To:
Remain in the posture 5-30 minutes. Benefits:
Cautions:
Tips/ Variations: If your knees are higher than your hips increase the height of your cushion. Experiment with your seat to find the best expression for your body. The more comfortable you make yourself at the beginning the easier it will be to stay in the seat. 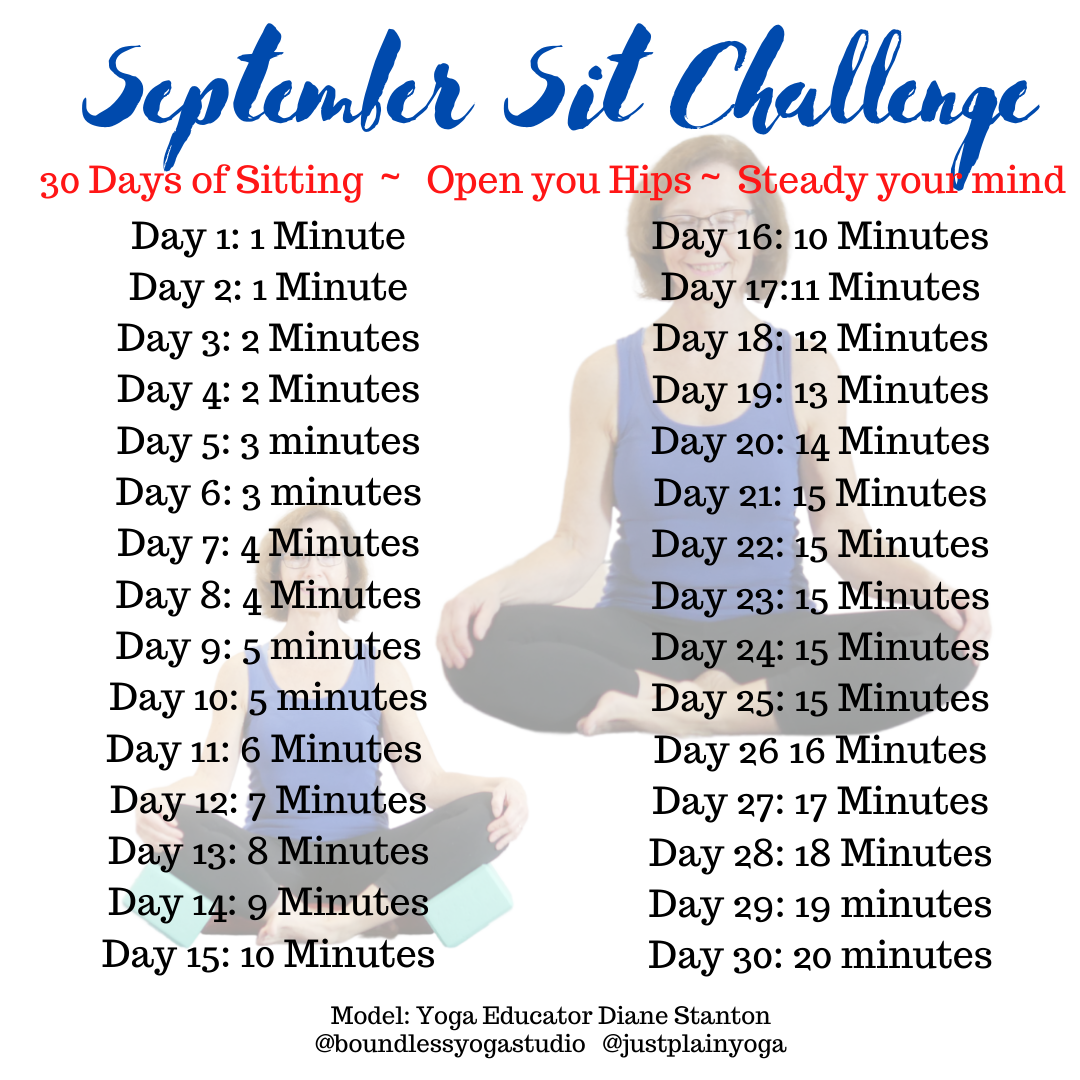  About our featured Models Maggie Wetzel: As a yoga instructor, it is with great honor to provide the Vinyasa yoga practice to others, beginners and advance students. Teaching you to optimize a yogic lifestyle to cultivate a healthy and flourishing life. The incorporation of the many aspects of yoga will be shown through teaching, demonstrating, and practicing.Practicing the belief that everything is possible, and nothing is perfect, allows for opening the heart space of those to allow freedom to interpret their own experience. Giving a safe and inviting space to those who seek. www.midfulmovementwithmaggiellc.org  Diane Stanton- Believing that everyone can benefit from yoga, Diane invites her students to build their yoga practices safely from a strong foundation, mindfully listening to their own bodies to discover their unique yoga experiences. Her curiosity of anatomy and body movement is constantly challenging her to learn how the amazing human body works, and how to impart this knowledge to her students in a meaningful way for the enhancement of their practice. Her goal is to provide new students with the opportunity to experience yoga in a safe and enjoyable way Diane's Teaching Schedule  About Chris Loebsack
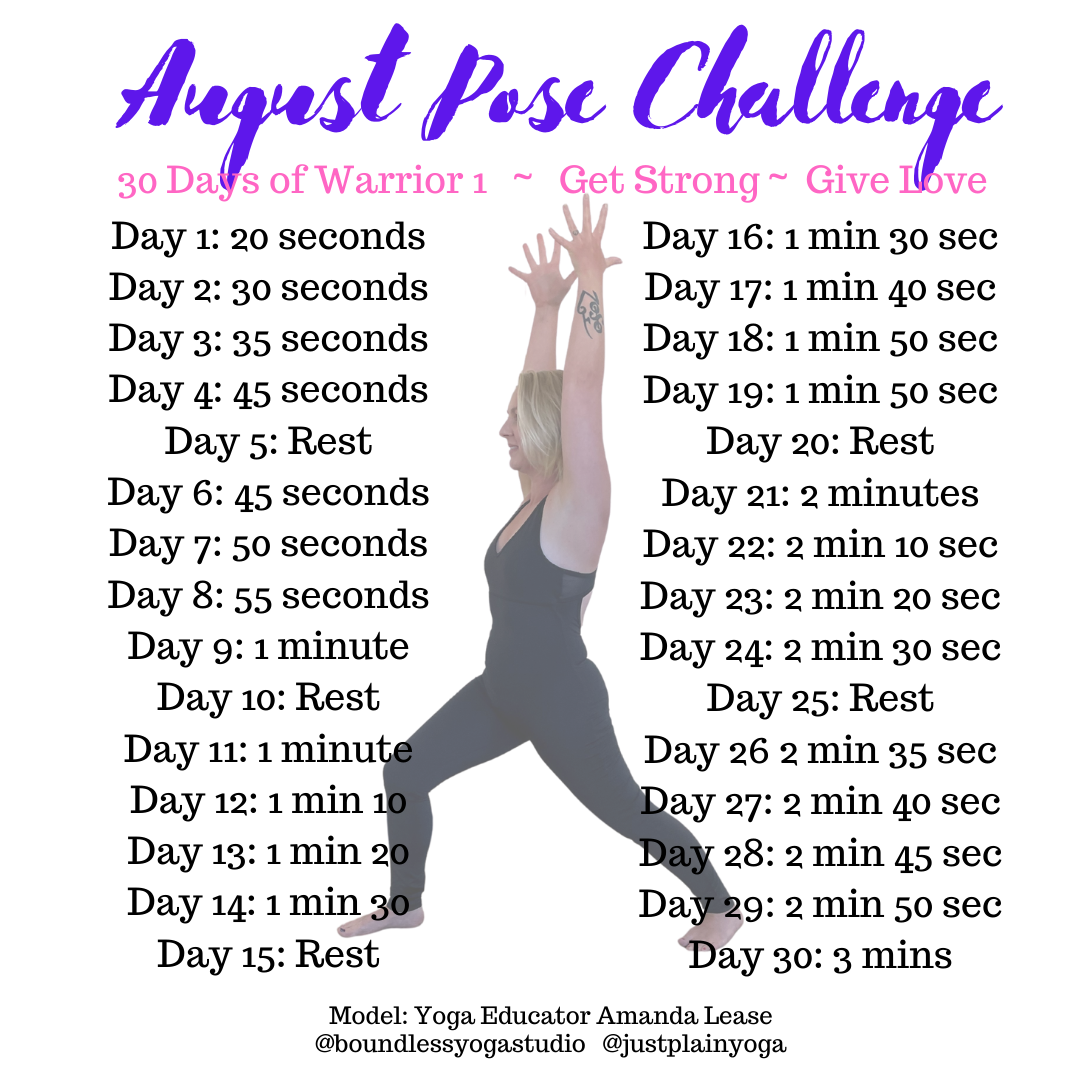 For more information on the lovely Amanda Lease Click on the Photo! Veer-bha-drah-shah-nah A Virabhadra (वीरभद्र) = Distinguished hero, also considered to be the fierce aspect of Shiva Asana (आसन) = Pose, Posture, Seat Virabhadrasana (वीरभद्रासन) Warrior 1 is a vigorous pose that fiercely strengthens the legs, while toning the core and shoulders. There is a bit more stylistic difference in the upper body depending on which tradition or lineage one follows. I will make note of some of the differences and leave it up to yogi's choice. Some variations feature a more upright spine and others a deeper back bend. I would say what you choose would depend on what you want to get out of the posture. For the monthly challenge above. Just Plain Yoga educator Amanda Lease is demonstrating a variation with a shorter stance and elongated spine. This variation will be accessible to most and offers the most support for balance and stability. What might be most notable about the pose warrior one is that it faces straight forward with an open hearted expression. This embodies strength within vulnerability. As we settle our feet deeply onto the earth we also reach joyfully towards the heavens above and as we breathe we allow our bodies to be suspended in the balance between. Some traditions teach warrior one with the back heel off of the ground. Most lineages will opt for the foot slightly turned out with the heel grounded. The majority will call the heel lifted version High Lunge and the heel down version Warrior One. We will continue with that majority rule nomenclature. 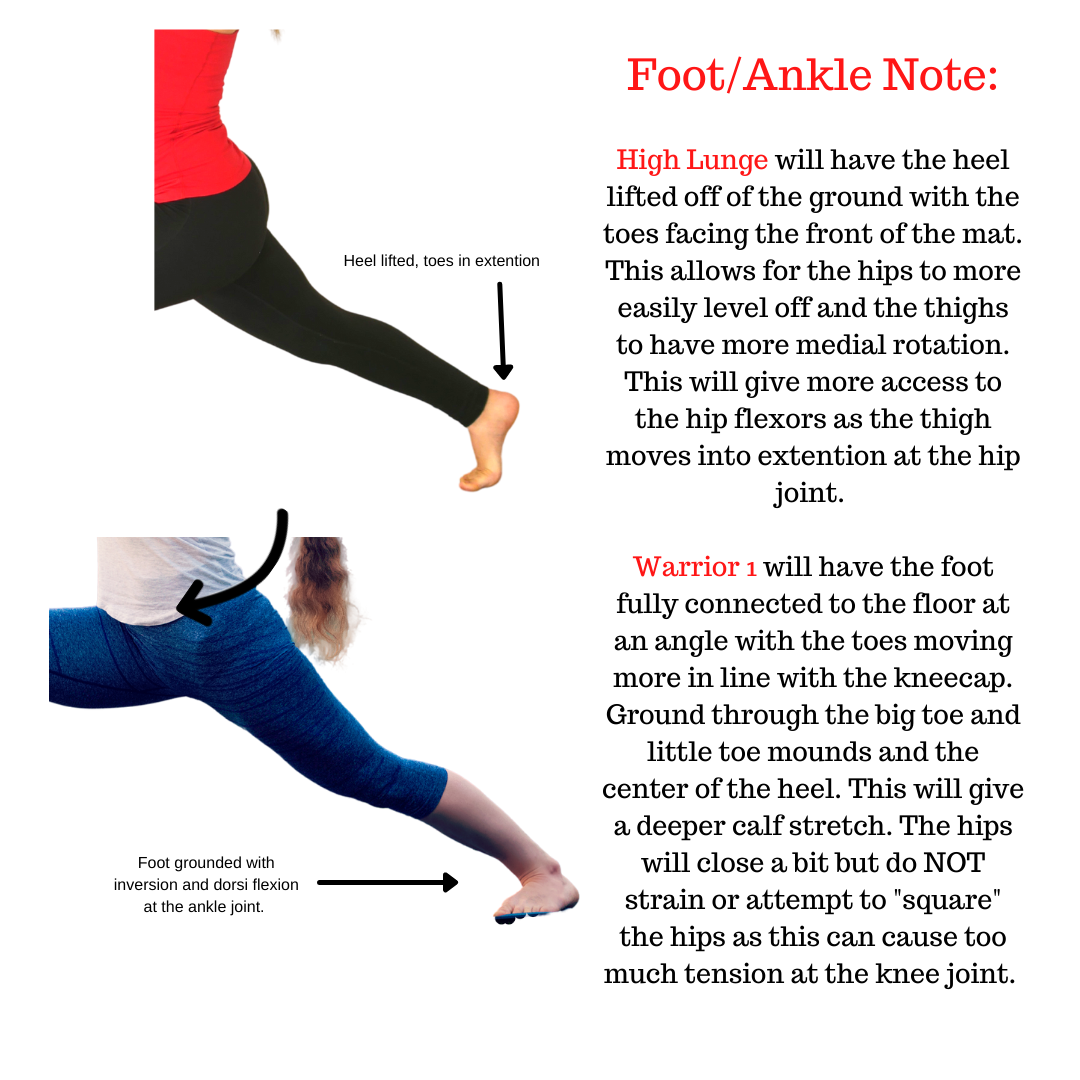 Cautions: With all exercise make sure you have communicated with your doctor to see if it is right for you. If you have uncontrolled high blood pressure, do not raise your arms overhead. instead practice the pose with your hands on your hips. How to do Warrior One Pose:
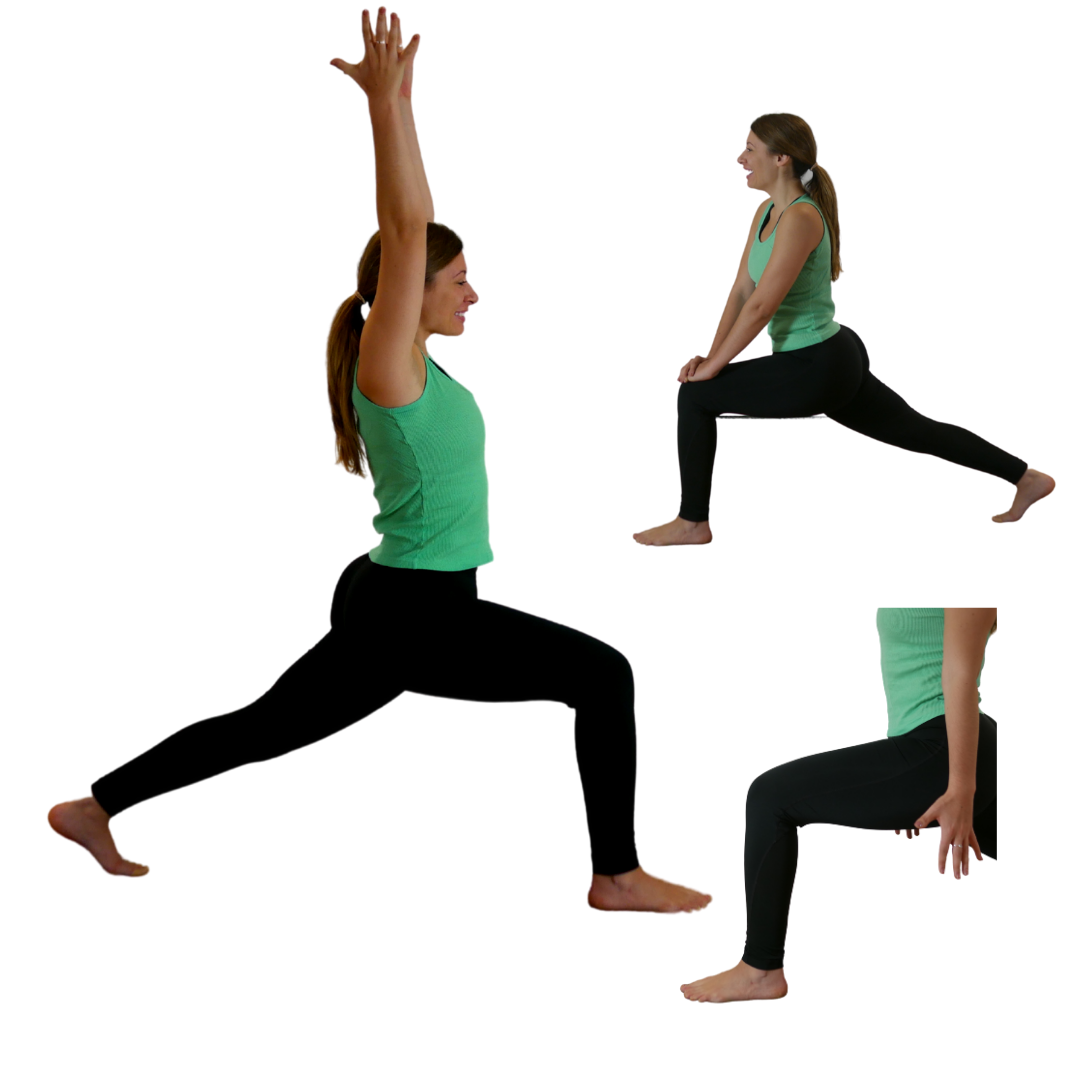 Educator Jessica Garris demonstrates arm variations in the High Lunge option. The greatest challenge in Warrior 1 is to get the angel of the foot comfortable and grounded while turning the hips towards the front. When I teach embodied anatomy courses I always take a poll to see what poses students love, what poses they find most frustration and why. Unanimously Warrior 1 always comes to the top three of the most hated yoga poses. Before you run away from the rest of this blog and challenge let me explain why students have felt that way and why with a little bit of adjustment warrior 1 can become a more loved expression. Most of what students hate comes from cues that do not serve the form or the individual bodies practicing. That's right I am about to blow up some outdated old school cues that simply do not align with the anatomy of the body and need to be pulled out of the yoga verbiage. Things you might here a yoga teacher say that you should absolutely ignore: STOP THE MADDNESS! Cue #1: Align the back heel with the front heel. - This cue only works if you have an extremely narrow pelvic girdle! Instead of trying to have the feet on one line like a tight rope move the feet wider apart (hips distance from side to side). This will give you better balance and make space in the pelvis for you to adjust the thigh bones which will alleviate a good deal of tension in trying to shine the hip points closer to the front of the mat. Please not that the original cue was from men to other men in the practice and that a man's pelvis is taller and significantly more narrow than a woman's pelvis. Students with a shorter broader pelvis (mostly women) can feel hip strain and forcing a narrow stance can lead to longer term chronic hip pain. So take up more space and fell free to move around your mat. Cue#2: Ground though the outer edge of the back foot- Please stop doing this immediately! Instead ground evenly through the center of your heel, big toe mound and little toe mound (on both feet). This will keep the feet even and the arches engaged. The reason we do NOT want to emphasize the outer edge is that can cause a force into supination of the foot putting too much strain on the outside edge of the ankle (lateral side) this tension runs up the outer edge of the leg and can add stress to the outer knee. Additionally, when we press on the outer edge (which you promise me you will not do anymore...) it pulls the thigh into lateral rotation which pulls the hip slightly open and that is exactly the opposite way your are aiming to place the hips so, you guessed it, that puts the hips and ankles at odds with one another and the knee takes all of the torque and strain in the battle between the ankle and knee. This is due to the screw home mechanism of the knee and, of course, the screw home mechanism of the knee is another blog for another day, so for now just lightly ground the whole foot and stop stressing the outer edge. Cue #3: Square your hips to the front of the room- Oh, my... where do I begin. OK this is ok and easy if the stride from front to back is relatively short and there is very little extension of the back thigh, or if you are in the high lunge variation where the back heel is off of the ground. Once you start to open up the pose and move the back foot further behind you that will pull the femur bone (thigh bone) further into extension and pull the pelvis along with it (increasing the forward/ anterior tilt of the pelvis). When we turn the back foot down to the angle it also pulls the pelvis slightly to the side (the longer the stride the bigger the pull). At a certain point it is anatomically near impossible to shine both hip points to the front of the mat while the foot and thigh are in that position. Instead more the hips forward (closing the hips, ipsilateral rotation/ adduction) to the best of your ability and enjoy the stretch. It should feel steady and opening, it should NOT be painful or exceedingly uncomfortable. Cue #4: When the arms reach up pull your shoulders in and down your back- Oh I apologize for swearing ahead of time, but for @#&^ sake tell the teacher to go take an anatomy class! I'll do my best to break this down in an easy fashion but warn you that the scapula humeral rhythm of the shoulder is also another blog in the making. The short form is that the shoulder blade, clavicle and arm bone are all connected and move together in actions that are coupled together so that the arm will stay lined up with the socket of the shoulder blade. When we lift an arm over head (flexion of the arm at the shoulder joint)the shoulder blade should be allowed to go with its natural movement which includes upward rotation, protraction and elevation. This mean that as we reach the arms up the shoulder blades will separate a bit and lift. This is normal! When a teacher says to pull your shoulders down away from your ears and onto your back they are trying to place the shoulder blades in the exact opposite of what is necessary to fully reach the arms overhead. At best it would be difficult to raise the arms and straiten the elbows, at worst with repetitive motion this can contribute to an impingement syndrome in the shoulders. So reach those arms high and let your shoulders rise. Give them freedom to move and this will increase the strength in the top of the shoulder while increasing the mobility in your LATS. You and your shoulders will be happier. When we have taken the time to evaluate what we need to create a balance of effort and ease in this pose we can then truly appreciate the power in the subtle actions of this incredible posture. Some easy and challenging possibilities below: 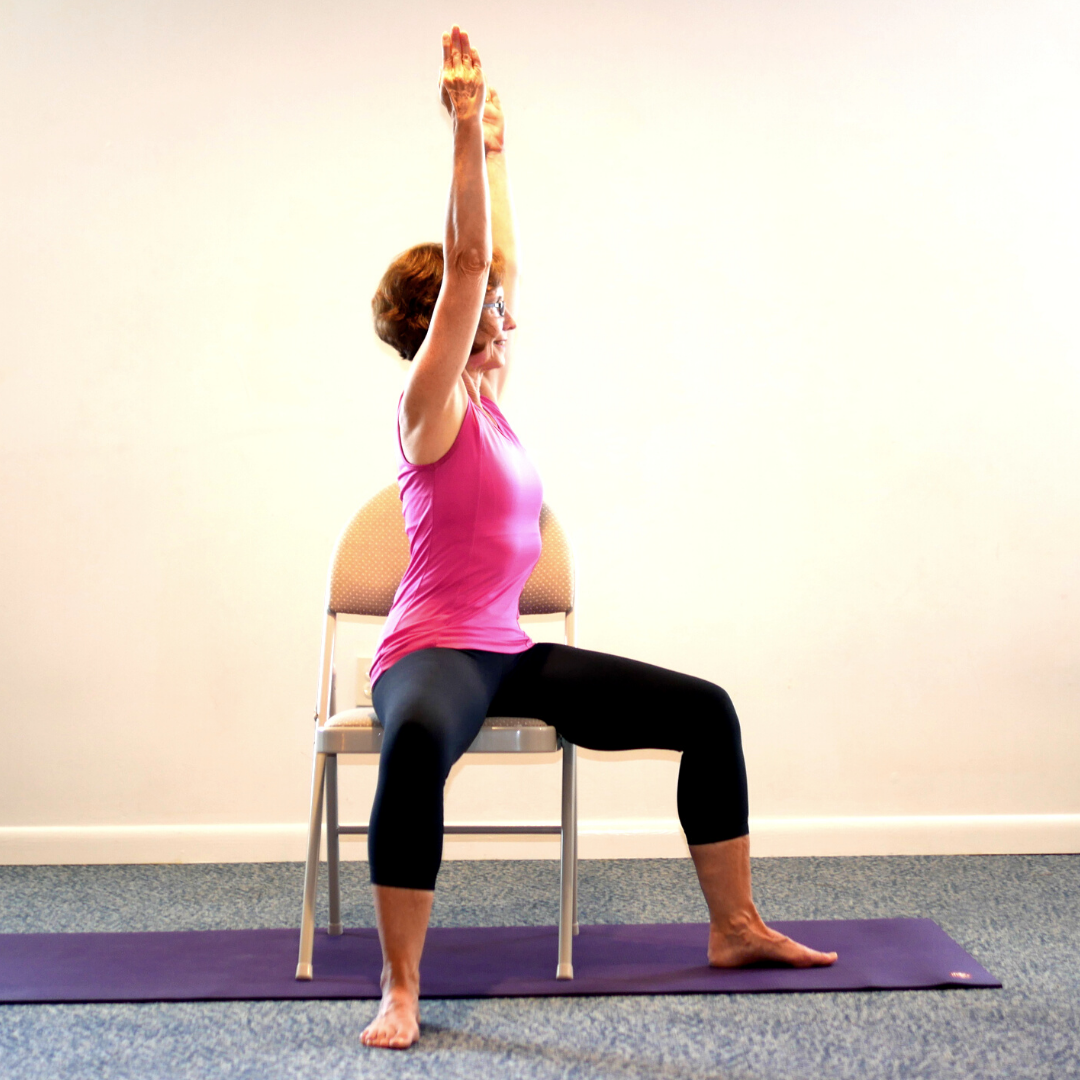 Educator Diane Stanton, showcases Warrior 1, Easy Chair Yoga Position. This takes balance and weight bearing off of the legs and gives more focus to the upper body. 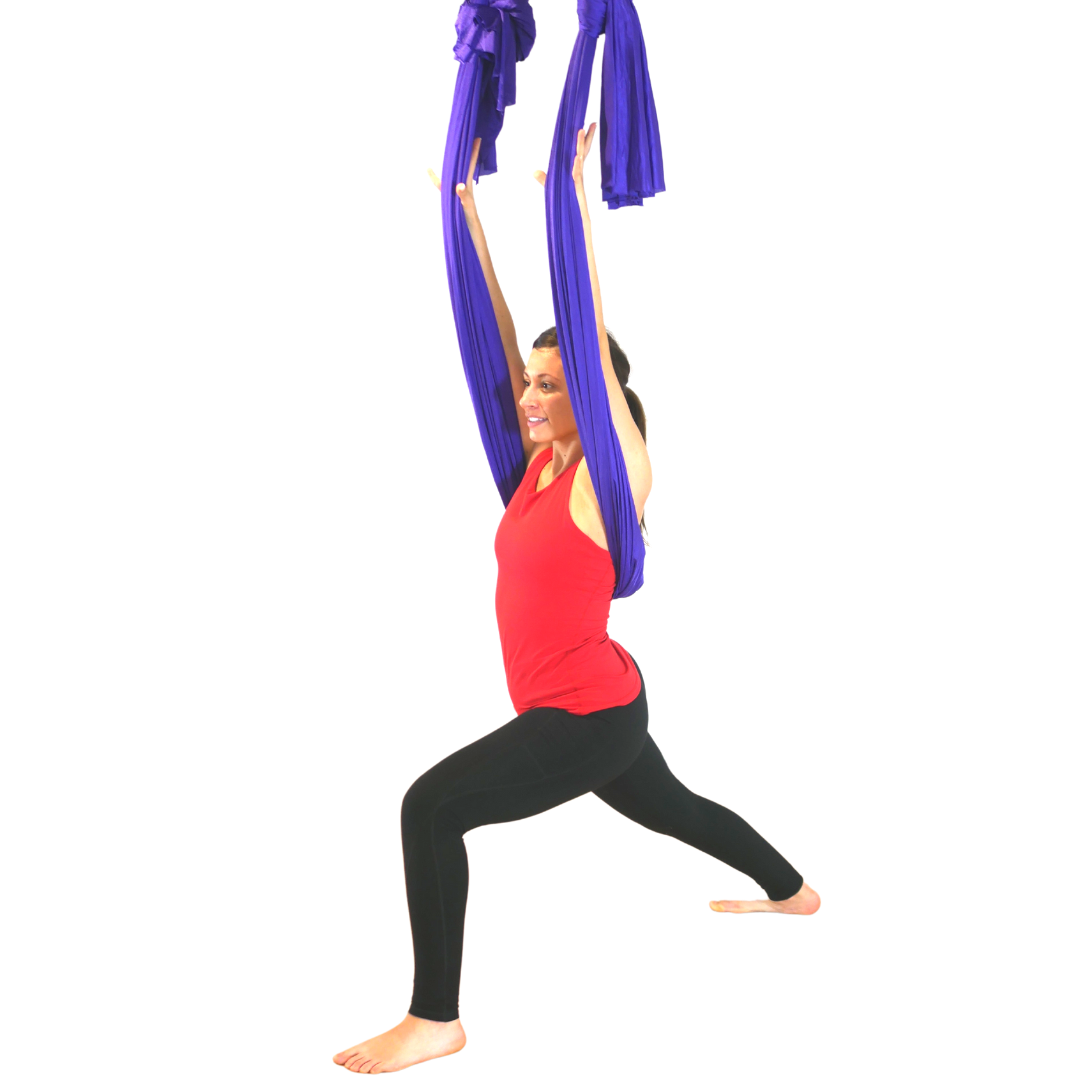 Jessica Garris shows us an Aerial Yoga Version in Thoracic Wrap. The fabric gives us feedback to help press and feel the reach of the arms. Shout out to Betsy Savoia at Honor YOga in Washington NJ. She teaches amazing Aerial yoga classes and has been running our challenges in her aerial classes. Give yourself permission to start small and build strength and range over time. Please send me your posture questions and requests, I do love a good geek out.
About Chris Loebsack
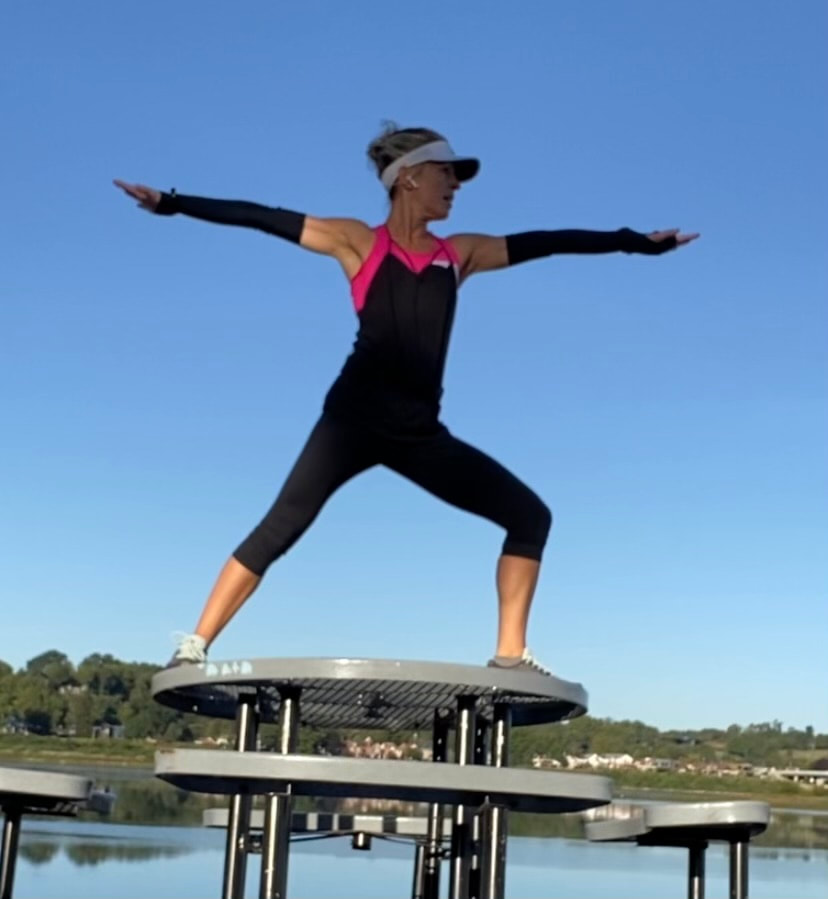 Yoga Educator Samantha Carney in Warrior 2. Check out her bio by clicking on the photo! Veer-bha-drah-shah-nah B Virabhadra (वीरभद्र) = Distinguished hero, also considered to be the fierce aspect of Shiva Asana (आसन) = Pose, Posture, Seat Virabhadrasana (वीरभद्रासन) Warrior 2 is a vigorous pose that fiercely strengthens the legs, while toning the core and shoulders. What might be most notable about the pose warrior two is how it also can make us feel so strong and powerful. As we build the power in our physical form we begin to transform the mental patterns that no longer serve us and stand equally in our emotional power. HOW TO GET INTO WARRIOR 2!
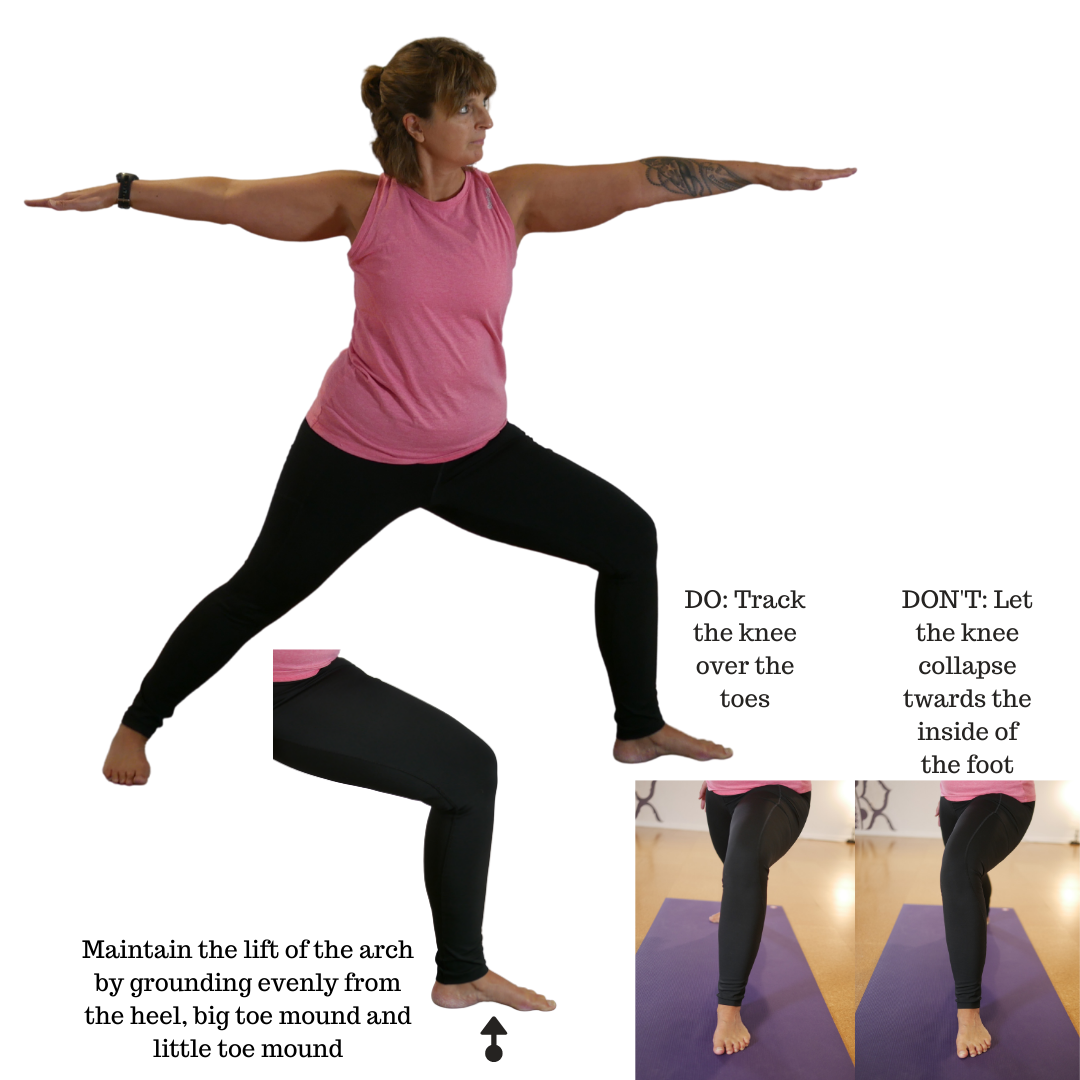 Yoga Educator Katy Case! Check out more about Katy by clicking on the photo. Warrior 2 is not as easy at it might look. It can be quite a challenge to keep the knee over ankle without letting it collapse. Once the hips are open to the degree that feels comfortable the rest of the turn of the body comes from the spine supported by the obliques (side abdominal muscles). Once you are in position focus on the quality of your breathing and work to finds some relaxation within your effort. You can find a meditative mindset and focus and channel the power of the warrior through your bones. Students who struggle with balance can use the support of a wall or a grounded chair. 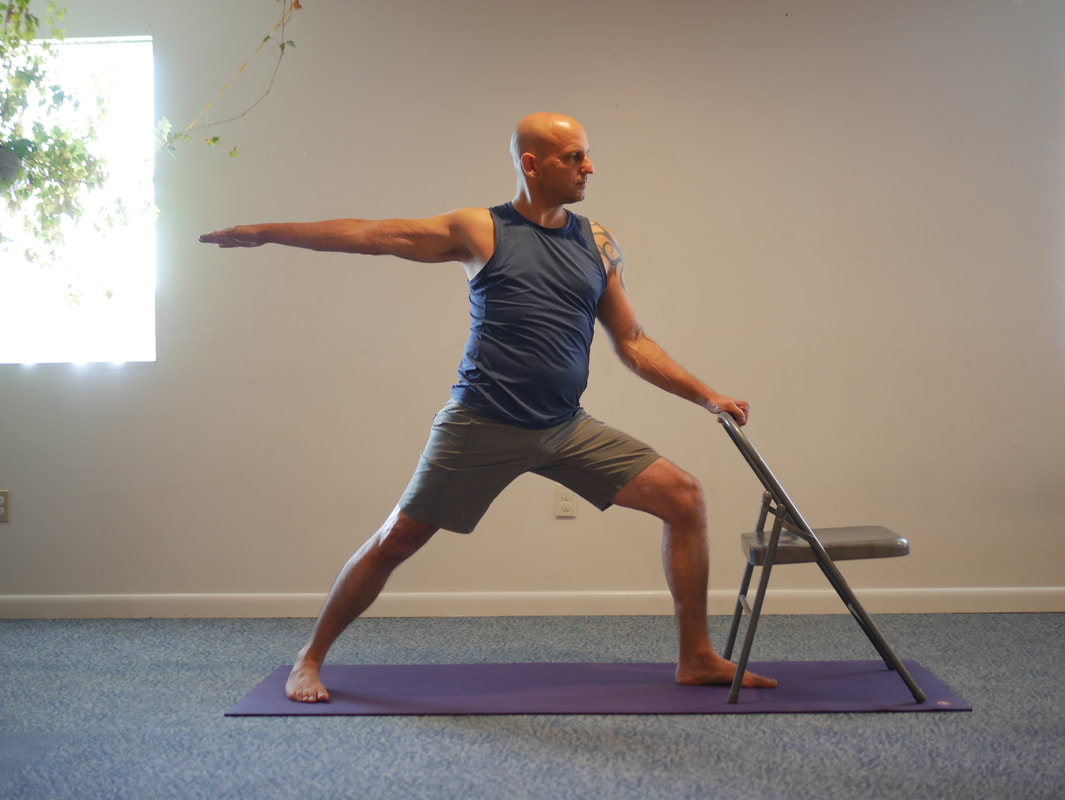 Yoga Educator Brian M. Davis demonstrating a supported Warrior 2. Check out more about Brian by clicking the photo. ReferencesIyengar, B.K.S. (1966) Light on Yoga, Yoga Dipiki. (3rd Edition) NY, United States of America. Schocken Books Inc. www.wikapedia.org About Chris Loebsack
|
Boundless Yoga Staff & StudentsWe are continuously interested on how our reactions and responses to our personal journeys, albeit travel, adventure, new job, etc. mirror and reflect our social, emotional and spiritual ups and downs. We try every day to apply what we learn about ourselves on the yoga mat to our personal lives. Thank you for tuning in as we share some of those aspects with you. Archives
December 2022
Categories
All
|
- HOME
-
- Book Club Discussion
- Spring '24 - Community Classes by Teachers in Training
- 4/2 - 4/30 (Tues) : Ashtanga 101
- 5/1 - 6/5 (Wed): Aerial Yoga Beginner Series
- 5/4 Introduction to Arm Balances
- 5/6-5/31 (Mon-Fri) : Morning Movement Challange
- 5/7 - 5/28 (Tues): Roll & Release Series
- 5/17- 5/19: Chair Yoga Foundations Course
- 6/1 (Sat): Inversions Demystified (Stroudsburg)
- 6/4 (Tues) Rhythm Flow Pop Up
- 6/7-6/28 (Fri): Freedom Flow @ Forevergreen
- 6/11- 7/30 (Tues) Arm Balance Academy - CE Program
- Schedule
- Yoga Online Anytime
- Contact Us
- Blog: Insights from our Staff and Students
- Community Resources
- Studio Rental
- Media and News
- Yoga Podcast: Chats from the Mat w/ Brian M. Davis
Get more updates and fun yoga information on our Facebook page!
 RSS Feed